

Easter is getting closer and closer, and you still have no idea what to put in the Easter basket for your loved ones? In this post, I will show you two quick photo gift ideas that you can easily implement and give away.
Most of us think of chocolate eggs and Easter bunnies when we think of Easter gifts. But if you want to give your loved ones something other than painted eggs or chocolate, you should try out the DIY trend. After all, doing it yourself is not only totally trendy right now, but also more sustainable. These personal gifts can easily be created by kids and promise to make your Easter basket more personal this year.
Tea lights with a hidden photo!
Here’s what you need
- Tea lights
- Photo prints
- Scissors
- A compass
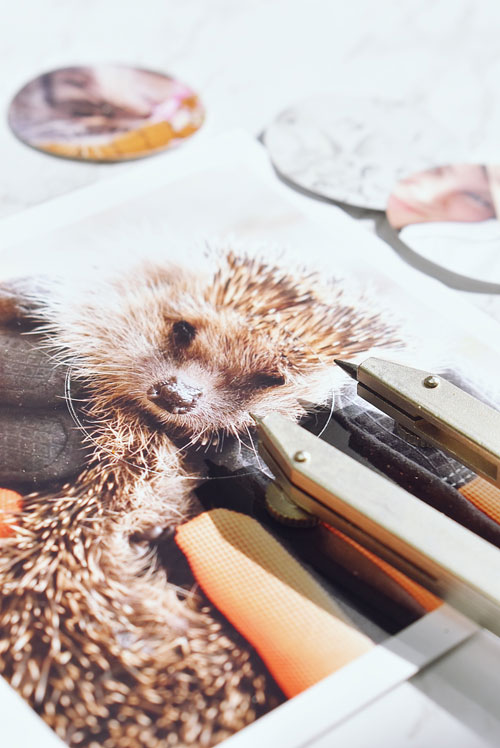
Step #1 – Prepare your photo prints
This great Easter gift idea hides a secret photo message that is not obvious at first glance. To do this, you first have to select a few photo prints, which you can easily print out and have sent to you using the MyPostcard app. Now cut out your chosen photos into the size of your tea light. I used a compass to draw the circle accurately.
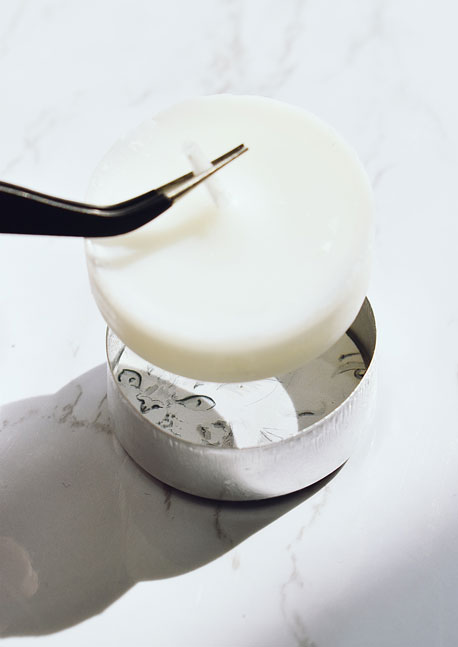

Step #2 – Decorate your tea lights
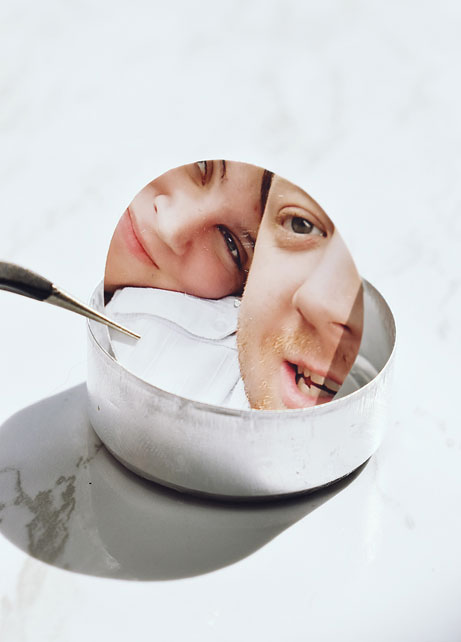
Next, carefully lift the wax part of the tealight out. Pull the wick with the metal holder down and out of the wax. You might want to cut the metal bracket a little smaller, so it doesn’t later cover your photo surprise.
Now you place the cut photo print in the metal tealight holder, push the wick back into the wax and carefully place the candle wax on top of the photo. If you now light the tea light, your cute photo surprise will appear after a few hours.
Shaker cards out of postcards – Easter edition
Here’s what you’ll need:
- A MyPostcard postcard or greeting card
- A see through case / cover (or you can add a magnetic case at the checkout with MyPostcard)
- Scissors and glue
- Colored paper
- Extras: Glitter, confetti
Step #1 – Cut your transparent case to size
Easter can be a little crazy, which is why you are guaranteed to put a smile on the lips of your recipient with this DIY shake card. First, you cut the transparent sleeve to the size of your postcard or greeting card.
Step #2 – Make your mini paper Easter eggs
You can now cut lots of tiny Easter eggs out of the cardboard and decorate them with patterns as you like. The finished eggs will later give your shake card that certain something – and lots of Easter vibes. Don’t forget to make an additional frame out of your colored paper – this will later cover the adhesive corners of our plastic. Simply cut out a frame the size of your card and set it aside.


Step #3 – Build your shaker card
Now that you’ve created both the Easter eggs and the frame, we’re ready to assemble the shaker card. The best way to do this is to use double-sided adhesive tape or a quick-drying glue of your choice.
First, lay the Easter eggs in the middle of your postcard or greeting card. If you like, you can add a handful of sequins. Then carefully stick the case.
Tip: Only glue the edges of your case.
Next, carefully stick your paper frame onto the case and press it firmly into place. Finally, you can decorate it with lovely Easter messages or Easter bunnies.
And your Easter shaker card is ready to be sent!

With these great (and easy) do-it-yourself gift ideas for Easter, you are guaranteed to bring someone joy. The photo gifts can also be made with children and are not only a great gift at Easter.
More Easter DIYs
If you are looking for more great DIYs for Easter, then you should definitely check out these articles:
2 Comments
These DIY gifts ideas are amazing! This can not only be given on Easter but on Christmas and others events as well. I am gonna make this and gift it on my friend’s birthday. Thanks for sharing!
Hey Olive, awesome, glad you found something 😀